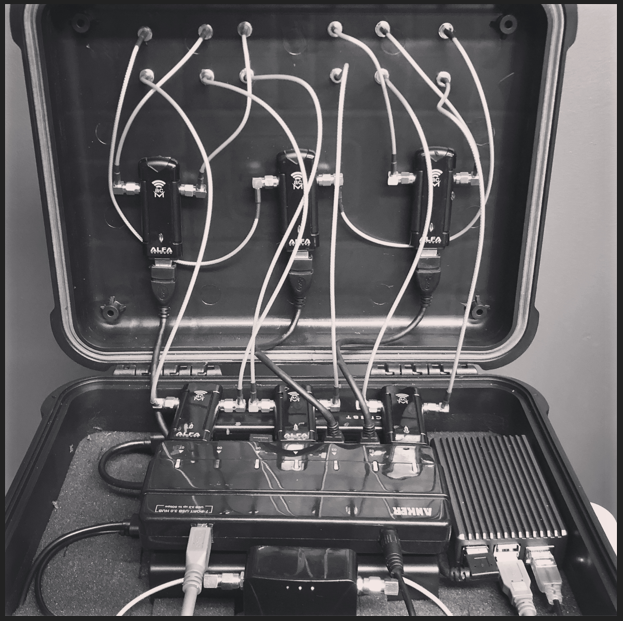
WiFi War Driving Rig Build
First I need to thank the community for the support. With help from the Kismet Wireless docs page, twitter folks, and the great folks in the Discord group who answered questions and set some things straight. I didn’t do this without the help of others. Its important for me to be clear about that. Really nice. Super great people.
Parts List
- RasPi 4 w/128GB Industrial R/W MicroSD
- MediaTech DualBand WiFi cards
- HyperJuice 27000mAh USB/USB-C battery pack
- I do not have a current link to this particular pack.
- TalentCell 12v DC out – Lithium Ion 38k mAh
- Anker powered 12v USB Hub
- This hub has been discontinued
- I strongly recommend 12v because of the power requirements on multiple radios
- GLiNet Mini Router
- **** UPDATE GPS ****
- Changed to the model recommended: to the GM-3N
- (https://www.transystem.com.tw/www/product.php?b=G&m=pe&cid=4&sid=20&id=123)
- (eBay No Longer has the correct model linked)
- USB-C, Micro USB cables
- 12″ and 6″ RP SMA Antenna Cables
- Harbor Freight “Apache 2800” case
- 3 Antenna magnetic base
- These are probably not really for a car, but its working :)
OS Selection and Settings
I first started with the latest Raspberry OS, however I had some difficulties with getting multiple Alpha cards to show in Kismet. There were a few rumblings in the KismetWireless Discord that others had heard or had similar experiences and a mention of moving to Ubuntu corrected this and moved and followed through.
Using the Raspberry Pi Imager (https://www.raspberrypi.org/software/) and the Ubuntu Server download ( Scroll down – on this link/page – https://www.raspberrypi.org/software/operating-systems/) I burned the image to the microSD card.

After booting through the initial startup I performed some ubuntu settings and updates:
- set the hostname
sudo hostnamectl set-hostname My-WiFi-PiDriver
- Installing net-tools
(I was just used to those commands)
sudo apt install net-tools
- (This is optional, my purpose was that I wanted to bring the kit back into the house or park it in the driveway and have it connect to my wireless network – then I can SSH to it, copy off the files and convert them for the WIGLE upload)
I used steps from this website: https://www.linuxbabe.com/ubuntu/connect-to-wi-fi-from-terminal-on-ubuntu-18-04-19-04-with-wpa-supplicant - Install the WiFi WPA Supplicant
sudo apt install wpasupplicant
- Generate the connection and set the services and restart to enable
wpa_passphrase <Your SSID> <Your WiFi Security Passcode> | sudo tee /etc/wpa_supplicant.conf
(to be done above with out the <> brackets)sudo wpa_supplicant -c /etc/wpa_supplicant.conf -i wlan0
sudo cp /lib/systemd/system/wpa_supplicant.service
ExecStart=/sbin/wpa_supplicant -u -s -c /etc/wpa_supplicant.conf -i wlan0
Restart=always
Installation of Kismet
Without recreating the entire install process which is well documented on the KismetWireless page – I used the packages install and used the line by line installation located here: https://www.kismetwireless.net/docs/readme/packages/
wget -O – https://www.kismetwireless.net/repos/kismet-release.gpg.key | sudo apt-key add –
echo ‘deb https://www.kismetwireless.net/repos/apt/git/focal focal main’ | sudo tee /etc/apt/sources.list.d/kismet.list
sudo apt update
sudo apt install kismet
Enabling KismetWireless to run as a service and make sure it starts up when the RasPi is powered up and the OS Launches
sudo systemctl enable kismet
Editing the KismetWireless configuration for my set up:
You want to edit the kismet_site.conf file because it is NOT overwritten in updates of packages and builds – so it will retain your custom configuration – it overrides the kismet.conf and you use examples from kismet.conf to build your kismet_site.conf file.
sudo nano /etc/kismet/kismet_site.conf
Then we are looking for the following items:
- GPS – locate the GPS Section in the config file.
This kit is using the GPSD function, its broadcasting that localhost and port and we point Kismet at it;
gps=gpsd:host=localhost,port=2947,reconnect=true
- WLAN Adapters.
I have 6 adapters – you can skip this if you prefer to define adapter sources after kismet has launched from the webpage – I am running headless and wanted everything running with as little interventions as possible.
(when I was testing, I only had 3 in here at first to make sure it was functioning as I needed and expected)
source=wlan1:type=linuxwifi
source=wlan2:type=linuxwifi
source=wlan3:type=linuxwifi
source=wlan4:type=linuxwifi
source=wlan5:type=linuxwifi
source=wlan6:type=linuxwifi
(CTRL-X, Y, Enter to exit)
As for all the other options – they are left at default – no other tweaks that I have done are proven for my setup so I am not documenting them right now. I would suggest however, you check into the channel hop and timing and possibly locking certain channels to certain wlan adapters so you can maximize efficiency.
Change the logging folder for Kismet so that the generated files are in a specific folder;
sudo nano /etc/kismetkismet_logging.conf
Locate the log_prefix section – change this to your desired location – I just made sure there was a folder under the user folder that I have set up:
log_prefix=/home/ubuntu/kismet
GPS Software
In order to get the GPS Lat/Long associated with the SSID’s that Kismet finds, the “gpsd” software requires install and config;
sudo apt install gpsd gpsd-clients
You will need to plug in your USB GPS device and then check for it to see which configuration hardware/device path it is under. I chose to play a game of which is missing or different an did the following command:
ls /dev
This listed all the devices available to the OS and then plug the USB GPS device in and run the same command to identify what the new/changed configuration device is listed. I found my GPS Device listed as ” ttyUSB0 “. We need this for the gpsd configuration next.
With in the gpsd configuration you must confirm/set these items:
- To edit the gpsd configuration file –
“sudo nano /etc/default/gpsd”
- The configuration settings I have:
# Start the gpsd daemon automatically at boot time

START_DAEMON="true"

# Use USB hotplugging to add new USB devices automatically to the daemon

USBAUTO="true"

DEVICES="/dev/ttyUSB0"

GPSD_OPTIONS="-n -b"
First we’re making the gpsd start automatically.
Second we’re making sure we can plug and unplug the usb gps and make gpsd know to check again
Third we have to tell where the GPS is being seen by the OS
Fourth we are setting gpsd options that I need to cite the source for – my notes reference one thing but the internet references another. (sorry for that, but that is how I am set up and its working)
Customizing Kismet Web Page (Change GPS Icon, Enlarge icon)
This comes from “MrBill” Over at Twitter https://twitter.com/SecureThisNow
*** It will get overwritten in each package and build release – you need to make the change each time ***
Optional: Increase size and type of GPS Icon:
# sudo vi /usr/share/kismet/httpd/css/jquery.kismet.gps.css(or if compiled from source)
# sudo vi /usr/local/share/kismet/httpd/css/jquery.kismet.gps.cssChange font-size to 30px
div.kg-top-icon {
display: inline-block;
font-size: 30px;
font-weight: normal; (edited)# sudo vi /usr/share/kismet/httpd/js/jquery.kismet.gps.js
(or if compiled from source)
# sudo vi /usr/local/share/kismet/httpd/js/jquery.kismet.gps.jsChange ‘fa-crosshairs’ to fa-map-marker’
gpsicon = $(‘i.icon’, this);
if (gpsicon.length == 0) {
gpsicon = $(‘<i>’, {
class: “icon fa fa-map-marker kg-icon-base”
});
Photo Gallery of the equipment


